用Madmimi來發電子報

之前就有聽人介紹Madmimi的EDM服務,最近公司也來用一下吧。想收到電子報的請按這邊註冊。

本來以為一切會順利無比,想不到,到了電子報要發出去的前一刻,才收到Madmimi官方的關切信函。一開始的信函內容是這樣子的:

Hi Laurence,

Macdara here 🙂 I see you’re ready to send your promotion off, sweet!

I just need a little info before I can get you verified. Let me know how your contacts signed up and agreed to hear from you when you get the chance. This way we can be sure to get you overall awesome sending!

Cheers,

Macdara

非常客氣地問我,我發電子報的連絡人是從哪裡來的? 於是我回信,這是從官網的whmcs系統中匯出的。想不到,Madmimi的官方還是不讓我過關,又來了一封信問得更詳細了:

Hi Laurence,
Thanks for getting back to us! I’m happy to get you sending shortly. Will you let me know how you gathered the contacts you didn’t collect from http://unethost.com/whmcs? It’s important that all the contacts you’re sending to gave you their permission to send to them.

Also, did the registration or opt-in process on the Unethost.com site specify these contacts were agreeing to hear from you via email?

I’m not trying to give you a hard time – we ask these questions of all our users to make sure you’ll inbox successfully 🙂

Best,

Kate

像這樣子這麼嚴格的問法,實在讓人心生放棄的念頭。在上頭的信函裡,Madmimi問我,「這些註冊的email,他們有沒有同意我寫信給他們?」 還問我,「在註冊的過程中,有沒有問人家,我可以寄信給你嗎?」

像我這麼含蓄內向的人,我怎麼好意思沒事亂發email給人家呢!所以我最後回信給對方的理由,我就寫得理直氣壯,大意是說『雖然我沒有問過可否發信的事,但是全部都是我的客戶』,  順便附上我從官網匯出的連絡名單原始檔。

I create two list: One name is whmcs, the other is firend. Just as the name
goes, one contact list is from whmcs system, and the other contact consists of my firends. As for the friend contact, I am sure that I have asked them. The registration process on Unethost.com does not ask this kind of email question. This is limited
by software system.

However, I am sure that my clients they permit my sending email to them.
WHMCS is a helpdesk system. If my client has problems, he will submit tickets
to my help desk system. At the meanwhile of submitting ticket, he will receive
his ticket from email too. Therefore, he can then just send and receive
tickets by email. If you take a look of my website, all the articles in
knowledge base, and files in download area, we do not require client login.
Given that anyone can get most of the free resources from our website, why
they choose to login? I believe the answer is obvious, because they are my
clients.

I provide objective information for you to justify my saying. The attachment
is the original file that I exported from WHMCS system.

最後,Madmimi官方回給我的信,還是讓我滿感動的 –> 他們終於相信我不是在亂發垃圾信了!

I really appreciate the detail. Thanks for taking the time to explain it so
well 🙂

It’s all I needed to hear, so I’ve verified your account and have sent your
email on its way now.
淺談hash dos攻擊

身為一個主機商,處理過的攻擊中,最容易得手的攻擊,往往是DoS攻擊。DoS又名denial of service ,這種攻擊的概念不強調去更改網站的內容或是偷取資料,只是讓網站倒站。相對於SQL injection, XSS這一類的攻擊,需要依賴寫程式的不小心。DoS單純又暴力,但是從攻擊者的觀點來說,非常的有效。

以php這種語言為例子,在寫程式的時候,可以利用$_POST[“name”]從用戶端的Post request中存取name這個變數。像這樣子的機制,就是php語言實作的hash tables(哈希表)所提供的。然而hash tables固有的特性之一,就是會有衝突的時候,即Hash Collision。攻擊者可以利用Hash Collision會消耗大量的CPU運算這個特性,發動hash DoS攻擊。

這個攻擊的發動方式是這樣子:攻擊者給予php網頁一個Post request,並且在這個單一的request之中,提交大量的參數,而且這些參數透過php的hash規則都恰好會發生hash collision。這樣子的攻擊方式,在2003年在許多語言(Perl, CRuby)中被發現。

目前,許多語言在其更新的版本中,已經有針對這一點去改善了。以php為例子,從 php的5.3.9版本開始,有一個指令 max_input_var,它可以去限制GET,POST,Cookie這些變數的長度,最長只能到1000。有了這個特性,要hash dos就不太容易了。

對於不幸使用舊版php的人,也可以考慮使用ModSecurity的規則來攔阻這種攻擊。例如下方的rule,就是類似max_input_vars的效果。

SecRule &ARGS|&REQUEST_COOKIES_NAMES|&REQUEST_COOKIES "@gt 1000" "phase:2, \t:none,log,block,severity:2,msg:'Hash DoS Detected'"

php handler — suphp, mod_php, cgi, fastcgi

在虛擬主機的控制台中,效能和安全性都關系重大的一件事,就是php handler的選擇。可以說是每一種handler都各有其特色。

(1) CGI是最古老的handler,因為最古老,也沒有什麼過人的長處。不快也不太安全。
(2) suphp是最慢的handler,但是它在安全性上其長處。如果使用者的檔案或是資料夾的權限設定太過寬鬆,suphp都會丟出error。可以說是超級嚴謹,一絲不苟。
(3) mod_php是最快的handler,因為它直接嵌入apache中,做為apache的module來執行。也因此,mod_php在執行網頁時,使用的是nobody這個user,而並非是php檔案的擁有者。所以mod_php並不太安全。
(4) fastcgi可以說是有各家之所長,速度上不輸給mod_php,又像suphp一樣,可以用php檔案擁有者的身分來執行。唯一的缺點就是fastcgi的設定也比較複雜。

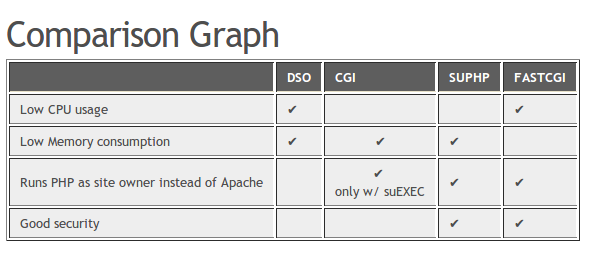
下方是一個圖表,用來說明這四種php handler的特色。

php handler 比較表

Unethost.com 採用的php handler是fastcgi。因為用了fastcgi的關系,客戶們並不需要將自己的程式中,被php寫入資料的資料夾設定成權限777。客戶們在public_html下的網站檔案,也不會被改成擁有者為nobody。

本來以為用了fastcgi這個php handler既有速度又有安全性。然而,真正的考驗是在當我們讓fastcgi上線之後一個月,機器開始瘋狂地當機。經過一番折騰後,才發現,原來php fastcgi內部有輕微的bug。這個bug會造成orphan process,也就是一些php的process,他們的PPID都會變成1。當這樣子的程序愈來愈多時,就會使用大量的記憶体,最後吃光主機的swap,導致當機。 一旦找出問題的根源後,要處理也就不難了。在我們加入了會自動去砍掉php orphan process的cron jobs,php fastcgi就平平順順地運作,再也沒有出過惱人的問題了。


延伸閱讀: 如何透過排程,解決fastcgi崩潰問題?


(本篇教學由unethost.com客服撰寫)

延伸閱讀:如何備份Cpanel後台安裝的套裝程式?

安裝上述的軟體,我們提供虛擬主機試用,七天滿意保證,
功能完整使用不受限制,歡迎點我申請。

webftp

虛擬主機因為是多人共用一台實體主機,當主機遭受DDoS攻擊,或是剛好執行一些備分的工作時,機器的負載總是難免會偶爾有上昇的時候。當機器的負載上昇時,除了網頁伺服器的反映速度會變慢一些之外,有時候比較嚴重的問題是,ftp會不停地斷線。

在一次偶然的情形下,我用filezilla會不停地斷線時,用webftp卻可以順利地上傳檔案!

這樣的一件事,讓我不由得開始重新檢視webftp和ftp不同之處。unethost.com的webftp是安裝在美國的主機上的。當使用者使用webftp時,其實檔案的傳輸是先從客戶端,走http的傳輸協定到webftp所在的機器,再透過ftp傳輸協定到真實的目標機器上。所以是兩階段式的。前面這一段往往是最容易逾時(timeout),最容易有掉封包(packet loss)的。原因是前面的這一段是從台灣連線到美國,所以延遲(delay)會比較長。考慮到前面這一段的傳輸有這種特性之後,就不難理解,為何webftp在這種條件下可以有較佳的表現了。http這個傳輸協定由於有較多的超文件標記(meta tag)本身對於這種延遲長、容易掉封包的連線,本來就有較佳的表現。而webftp很巧妙地剛好可以利用http這個傳輸協定來處理前一段的連線,所以就可以在filezilla動彈不得的時候,依然順利地達成上傳檔案的任務。

利用VPN及Host Access Control來避免scan password攻擊

VPS客戶和獨立主機客戶最頭痛的問題之一,莫過於admin的帳號/密碼外流了。舉個例子,如果ssh port設成22,那主機必定不停地回報被大量地敲門–因為網路上總是不停地有大量的攻擊者試圖透過暴力法來猜測ssh的密碼。同樣的原理,由於cpanel登入的port是2083或是2087,這兩個port也是會不停地被攻擊者試探。

有沒有什麼比較簡單的方法可以解決這個被攻擊者試探的問題呢?畢竟,並不是每一種服務的port都可以輕易地修改的。

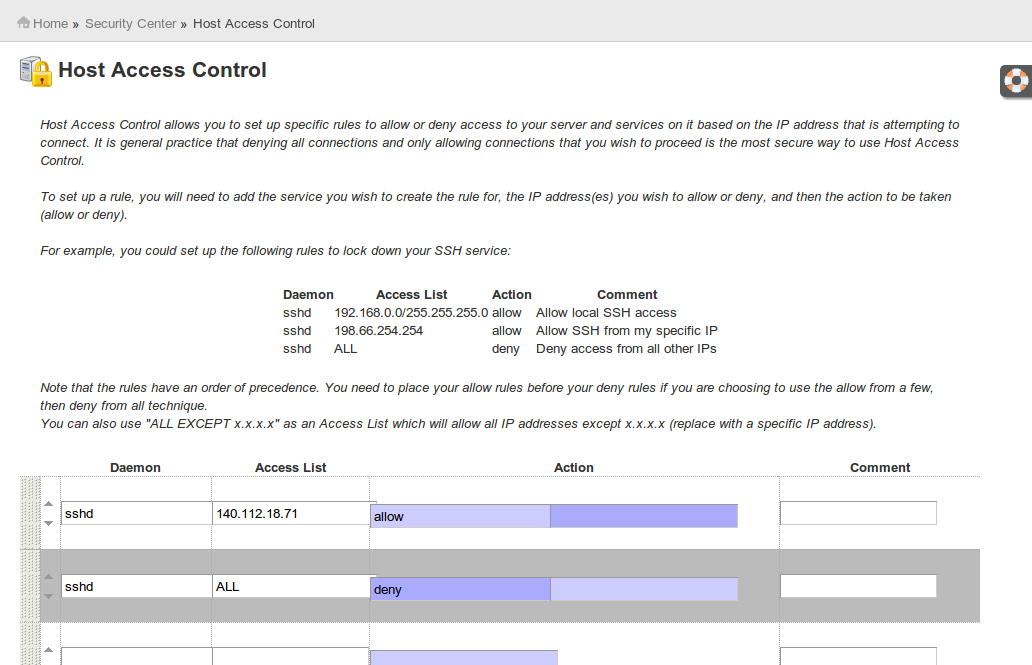
單純又暴力的解法,就是設定白名單(white list),限定只有從某些特定IP address來的連線,才會被接受。這個功能要透過cpanel的Home >> Security Center >> Host Access Control 來設定。下圖的範例是設定一台主機的sshd服務,只容許由140.112.18.71這個IP address來登入,即設定sshd 的白名單。

Cpanel Host Access Control

然而,這樣子的設定,有一個難題,以台灣的用戶,很多人是沒有固定IP的,此外,一旦用筆電在外頭上網時,就是使用動態IP了。這種時候,如果搭配 VPN使用,就可以輕易地在任何時間/地點取得固定的同一IP Address。如此一來,只要把Host Access Control中容許的IP address設定成為VPN的IP address即可。

如何在centOS上,透過yum安裝基本的web server

有的客戶因為要跑相對比較吃硬碟I/O數的遊戲,喜歡不裝cpanel。但是不裝cpanel的話,剛拿到的centOS是連完整的web server環境都沒有的。本文就是來講解,如何在一台乾淨的centOS上,透過yum安裝基本的web server

(*) 安裝web server
1 for php
yum install php

2 for ioncube loader ( ioncube loader是一個跟加密的php source code有關的模組,不灌這個的話,如果要執行的插件是有加密的php source code,就跑不動了。)
wget -q -O – http://www.atomicorp.com/installers/atomic |sh
yum install php-ioncube-loader

3 for mysql
yum install mysql mysql-server php-mysql
chkconfig –levels 235 mysqld on
/etc/init.d/mysqld start
修改mysql的 password
/usr/bin/mysqladmin -u root password ‘你要設定給mysql root的密碼

4 for httpd
yum install httpd
service httpd restart

如何透過shell script來做domain name的篩選

如果從cpanel WHM抓出所有主機的域名(domain name)時,往往會發現,子域名(sub domain) 和頂層域名(top level domain) 是混雜的。

這時候,可以用基本的sed來做篩選。做法如下:
在一個文字檔 list 裡放所有的域名,例如:

aa.bb.com
cc.net
1123.org
1aa.bbcd.com

下指令:
cat list | sed -e “/[^\.]*\.[^\.]*\.[^\.]*/d” | sort

即可抓出所有想要的top level domain。( 這個指令的功能就是把所有的sub domain刪去而已。)

如何設定mysql的自動備分

cpanel有一個功能是mysql備分,這個功能有一個不足的地方是,沒有辦法設定成自動化的。然而,只要透過ftp上傳一個shell script,再加上crontab的設定,還是可以完成類似的事。

下方是shell script的內容,將這個shell script用文字編輯器,編輯好之後,存檔成為backup.sh。並且在透過ftp上傳到使用者的家目錄下之後,加上可執行的權限。

#!/bin/sh
receiver=此處填要用來收backup的email
mysql_username=此處填mysql的使用者名稱
mysql_dbname=此處填mysql的資料庫名稱
mysql_userpwd=此處填mysql的密碼
file=./mysqldb_`date ‘+%m-%d-%Y’`.sql.gz
name=mysqldb_`date ‘+%m-%d-%Y’`.sql.gz
mysqldump -u $mysql_username -p$mysql_userpwd -h localhost –routines  –single-transaction  –skip-add-locks –skip-lock-tables –default-character-set=utf8 $mysql_dbname | gzip > $file
uuencode $file $name  | mail -s “Database backup” $receiver
rm $file


接著就要來設定cron job,cron job可以透過cpanel的GUI來設定。下方的例子,就是每天的0時0分要執行一次這個backup.sh。

0 0 * * * /home/使用者名稱/backup.sh>/dev/null 2>&1

Fastcgi and Custom php.ini

如果主機的php是用fastcgi的方式來配置時,會發生一個現象,無法用.htaccess來修改php.ini裡的參數。這時候,就必須做一些特定的修改,才能辦到。

何時會需要修改php.ini的參數呢?一個很常見的例子,就是register_globals 。在php 4之前,這個常常是On的。但是為了安全性,php 5開始,及很多新的php套裝程式,都必須是Off才能安裝。

1) 將客製化的php.ini ( custom php.ini )移到 public_html/cgi-bin/這個資料夾下

2) 在 cgi-bin 這個資料下, 生成 php.fcgi 這個檔案,並寫入下方的內容
#!/bin/sh
export PHP_FCGI_CHILDREN=1
export PHP_FCGI_MAX_REQUESTS=10
exec /usr/local/cpanel/cgi-sys/php5

3) chmod +x php.fcgi

4) 上傳 .htaccess 到 public_html資料夾,並加入下方的內容
AddHandler php5-fastcgi .php
Action php5-fastcgi /cgi-bin/php.fcgi

5) 在php.conf中,加入path
在 /usr/local/apache/conf/php.conf 這個檔案中,加入下方的內容
Action php5-fastcgi /cgi-bin/php.fcgi
AddType application/x-httpd-php .php

6)萃取apache的conf檔,並且重新啟動之
/usr/local/cpanel/bin/apache_conf_distiller –update
/scripts/rebuildhttpdconf
/etc/init.d/httpd restart

後記:
經過我們實際上的實驗,(4)這個步驟修改.htaccess檔在某些情況下,必須省略。例如,要修改的網站,本身的空間裡有附加(attach) 子網域(subdomain) 的時候。

灌Memcached於Fedora 17/16, CentOS(RHEL) 6.3/5.8

在部分舊版的fedora或是CentOS上,直接用yum是沒有辦法裝memcached的。所以這種時候,必須要引入額外的repositories

(1)安裝Remi repository (Fedora 12~17, RHEL 6不需要)

## Remi Dependency on CentOS and Red Hat (RHEL)
rpm -Uvh http://dl.fedoraproject.org/pub/epel/5/i386/epel-release-5-4.noarch.rpm

rpm -Uvh http://rpms.famillecollet.com/enterprise/remi-release-5.rpm

(2) 安裝memcached的軟体包(package)
如果是fedora 17/16/15/14/13/12或CentOS 6.3/6.2/6.1/6

yum install memcached

如果是 CentOS 5.8

yum --enablerepo=remi install memcached

(3) 設置memcached

vim /etc/sysconfig/memcached
PORT="11211"
USER="memcached"
MAXCONN="1024"
CACHESIZE="512"
OPTIONS=""

(4) 啟動memcached

# Set Memcached to start automatically on boot
chkconfig memcached on
# Start Memcached
/etc/init.d/memcached start
## OR ##
service memcached start

(5) 檢查memcached是否正常的運作。

echo stats | nc localhost 11211
STAT pid 7599
STAT uptime 10
STAT time 1265288542
STAT version 1.4.4
STAT pointer_size 32
STAT rusage_user 0.003999
STAT rusage_system 0.052991
STAT curr_connections 10
STAT total_connections 11
STAT connection_structures 11
STAT cmd_get 0
STAT cmd_set 0
STAT cmd_flush 0
STAT get_hits 0
STAT get_misses 0
STAT delete_misses 0
STAT delete_hits 0
STAT incr_misses 0
STAT incr_hits 0
STAT decr_misses 0
STAT decr_hits 0
STAT cas_misses 0
STAT cas_hits 0
STAT cas_badval 0
STAT auth_cmds 0
STAT auth_errors 0
STAT bytes_read 6
STAT bytes_written 0
STAT limit_maxbytes 536870912
STAT accepting_conns 1
STAT listen_disabled_num 0
STAT threads 4
STAT conn_yields 0
STAT bytes 0
STAT curr_items 0
STAT total_items 0
STAT evictions 0
END

# Try to get some value
echo get some_value | nc localhost 11211
END

# Not found, but check the stats again
echo stats | nc localhost 11211
STAT pid 7599
STAT uptime 10
STAT time 1265288542
STAT version 1.4.4
[...]
STAT cmd_get 1
STAT cmd_set 0
STAT cmd_flush 0
STAT get_hits 0
STAT get_misses 1
STAT delete_misses 0
[...]
STAT evictions 0
END

(6) 打開firewall

加下方的 INPUT 規則:

-A INPUT -m state --state NEW -m tcp -p tcp --dport 11211 -j ACCEPT

重新啟動 Firewall:

service iptables restart
## OR ##
/etc/init.d/iptables restart